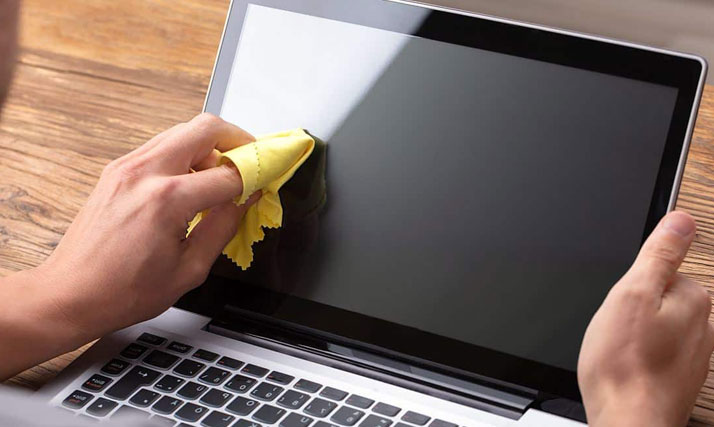
Do you have a laptop? A laptop is one of the tools that technology has an important role for our daily lives and can also facilitate any activity we do. To keep the laptop still works well, you are required to maintain the cleanliness of the laptop itself. Because the laptop is a practical technology tools and can be taken anywhere, the dust will surely be easily attached to your laptop screen. To clean up the dust on the screen, you can use with chemical cleaning solution that is safe and has no impact damage to your laptop screen. Below is a simple guide to remove marks from laptop screen.
Materials:
Soft cloth.
Bottle.
Isopropyl alcohol.
Water .
Steps to remove marks from laptop screen
Make sure before you start to clean the laptop must be turned off and no electric current is connected.
Use a soft, dry cloth to clean the dust on the screen.
Mixed water and isopropyl alcohol into the bottle with the same comparison, and shake until it is completely mixed.
Pour water on a soft cloth until the cloth becomes damp. Wipe the screen slowly in one direction.
After the dust is clean, use a soft cloth to dry your laptop screen. So your laptop will be durable from damage.
Warning:
If you don’t have a microfiber cloth, you can replace it with other cloth that have a soft material to prevent any scratches on the screen.
Every now and then you may have to split a pdf you have received or merge many of them into one pdf. Well, if this is something you are faced with, then there is a great free program available to do this, and I use it quite a bit. It’s called PDFill and can be downloaded here. The program is capable of a lot more than just what we are going to do here and I will be doing some other tutorials on some of the other functions at another time. There is also a Pro version available for the PDFill Editor. Unfortunately, you can’t convert a PDF to Word using this program though. Oh, and unlike a lot of the free programs out there, it won’t leave an annoying watermark, which is great.
I have tested and used this software on Windows 7 without any issue. If you are using it with Vista or Windows 7, make sure that Java is installed first and then this program. It requires Java to be present on the machine it’s running on for Vista and 7. You can download Java from here, but you should already have it installed. If you are unsure, either check to see in your Control Panel or use this link and click ‘Verify Java’.
Note: If you are using Vista or Windows 7, right-click on the program when you have downloaded it and select ‘Run as administrator’. If you are using XP just double-click on it as you normally would.
Steps to Split or Merge Multiple PDF Files
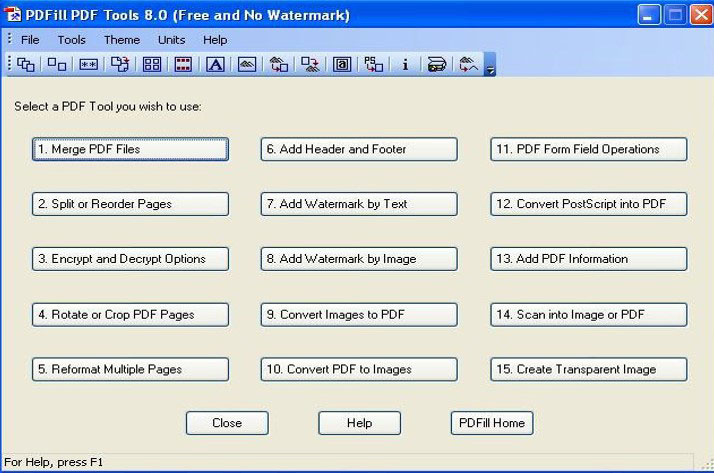
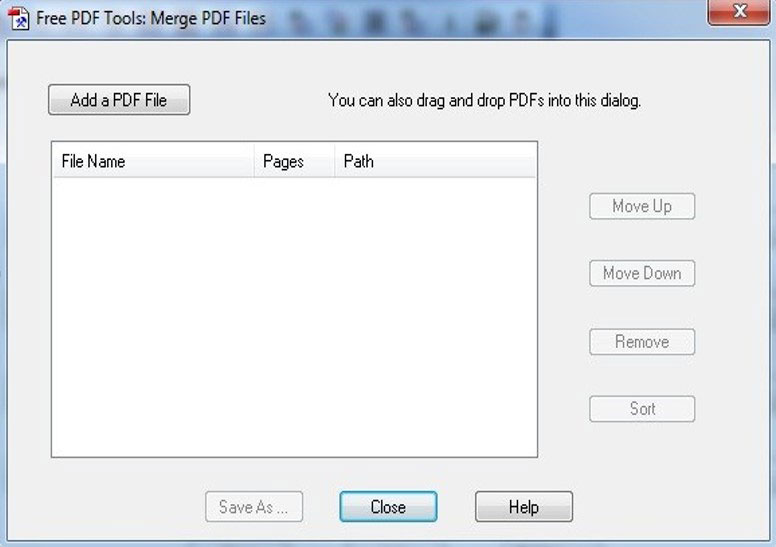
Once you have downloaded the program, open the ‘PDFill PDF Tools’ short cut that will be on your desktop, or just go Start>All Programs>PDFill>PDFill PDF Tools, and you will see the main window:
Now, for the sake of this tutorial lets say that you want to split 1 PDF that is anywhere between 3 to 30 pages (not sure what the upper limit is) and reorder the way in which the pages appear (eg page 4 should be first and page 15 should be page 7) or you just wanted to split the multi-page pdf into separate single pages, or merge multiple PDF’s together.
Note: It’s best to have the PDF that you are going to work on in its own separate folder as this will make things less confusing if you are splitting a PDF with a lot of pages.
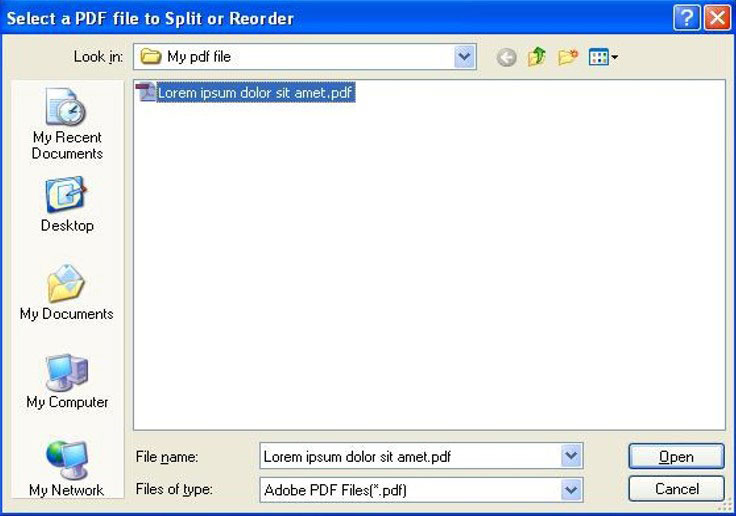
Lets deal with splitting the PDF into single pages first. In the main screen, select ‘Split or Reorder Pages’ and navigate to the folder (or desktop) where the file is located. Select the PDF and press ‘Open’.
This will then present you with the next window:
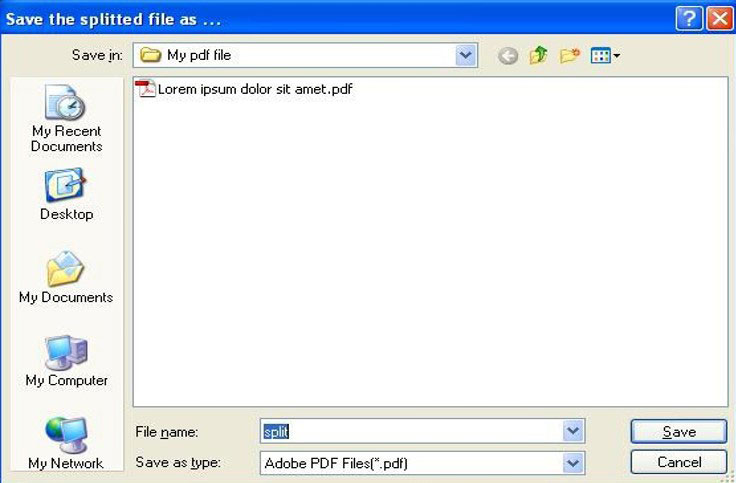
In the top section ‘Split Pages From’ select the range of pages you wish to split up. For myself, I wanted each page separated into its own PDF. The original PDF was 5 pages long, so I split from 1 (first page) to 5 (last page) and checked the ‘Extract Pages as Separate Files’ box. Now click ‘Save As’ at the bottom and name it something like ‘split’ or whatever you wish, and hit ‘Save’.
I saved it with the name ‘Split’. It will then output the split PDF’s in numerical order, prefixed with the word ‘split’ as shown below:
Now let’s have a look at how to join/ merge multiple PDF’s in to one single PDF
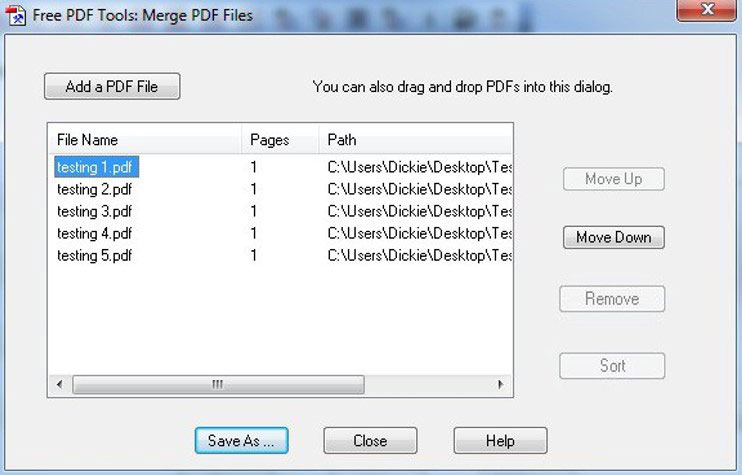
Have the multiple PDF’s in its own folder (eg Desktop) so that you can easily grab them all at once. Now start-up the PDFill PDF Tools and from the main window select ‘Merge PDF Files’.
This will open the next window as shown below:
Now either drag-n-drop the PDF’s that you wish to merge together into the program window. They may be out-of-order, so re-order them starting from the top to the bottom by highlighting the page (PDF file) that you want in a different order and use the ‘Move Up’ or ‘Move Down’ buttons on the right to re-order if needed.
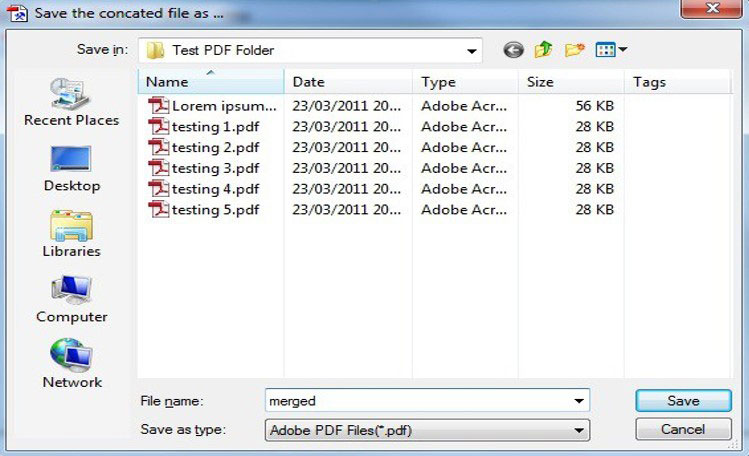
When ready, press ‘Save As’ which will open the next window as shown below:
Give your soon-to-be merged pdf a name (I called mine ‘merged’) and hit ‘Save’. The file will be automatically saved into the same file as where the split PDF’s were and the newly created PDF will automatically open.
I hope this has helped. If there are any questions or comments, please leave them below.
How to start to use iPad air without fuss? Nowadays, we can see various brands of gadget that become popular in society. It can be denied that cellular phone has experienced the innovation where last years, cellular phone is just a thing to call and text message. In this era, cellular phone has been equipped with platform where it can work smartly and help people to do communication in any ways. If you have bought one of gadget from Apple brand, which is iPad and still confused how to start it, it means you are in the right place. Here’s tips to use iPad Air.
How to use iPad Air easily
In this discussion, we will talk about how to started with the iPad Air properly.
Firstly, you have to click the main button of iPad air and then you will see the Helo word from various languages with rub the screen left or right. If you need the information about that iPad air, you can click i letter below.
The next step is choose the language and your country. This step can determine the time, weather, date, and so forth. You can move to find the location only use the Internet connection. You will get information about application that will be useful to determine or find location.
The iPad can be started from arrange the Touch ID. With this feature, you can open your gadget uses the fingerprint. Choose the 6 code to protect your data. You can take the data from your old gadget uses iTunes, iCloud, or from Android. Automatically, all of your data will be back to your new iPad air.
iPad users should have the Apple ID and its code to use all of the applications from this gadget. Set up siri is recommended to do so you can get information by asking from your voice. How to start to use iPad is finished if you have clicked ‘start‘ from this gadget.
Nowadays, almost all people in this world have the smartphone, tablet, and any kind of high technology thing. One kind of gadget that is popular is iPad air. This gadget can be used to manage of your mobility; such as calling, texting, browsing, and so forth. Yet, not all people cab operate this kind of gadget. Therefore, this article will share the 5 tips on how to operate iPad that may help you.
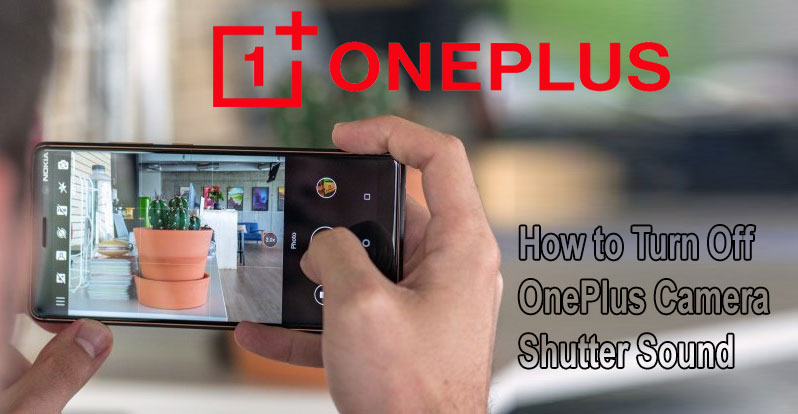
Nowadays, almost everyone when they feel happy for them, they think to capture the moment by taking photos with a camera phone because it is considered easy and fast. Almost everyone is trying to turn off the sound of the camera, as well as disturbing others sometimes it is also making its first embarrassed when they are in an isolated place. For users OnePlus phone, you also hoping to turn off OnePlus camera shutter sound when you are taking pictures.
You should know that OnePlus phone has a very nice camera to use in taking pictures or video. But this camera shutter sound annoying to some people and even the clicking sound can attract unwanted attention especially when you take a selfie. To be able to turn off the sound of the camera when you are taking a picture, you have to do is follow the guide on how to turn off the sound of the camera on OnePlus phone and also just shrink the sound of the camera on OnePlus phone.
Steps to turn off OnePlus camera shutter sound
Use a third party camera app
The first way you can do is use a third-party camera apps in the Play Store and download it so you can choose which of the camera application does not cause noise. Why should we use it? The reason for this is because the stock Android camera app plays a shutter sound when you take a picture, but not all camera apps do this.
How to mute or turn down the volume
Other easier way that you can do it quickly is to disable or turn down the volume on the smartphone by pressing the voice button.
Press the volume down button on the side OnePlus phone.
Hold until an incoming phone to vibrate.
Press again until the phone will go on when the sound volume on silent mode.
If the phone has been in Silent Mode, the camera shutter sound will not be heard when you go to take a picture.
Plugging headphones in won’t work
Other ways to mute the sound of the camera is plug headphones into the smartphone . In most cases when you plug headphones in, all sounds from the device will play through the headphones instead of a smartphone . But you should know that in this way you can use for other smartphones and will not work on OnePlus phone.
Laptop or MacBook might be one of the most essential types of gadget that you need these days. There are so many things that you can do using laptop. You can make your reports by using laptop. You also can finish your work with laptop as well. Some people even compose music or create their own movies using laptop. Laptop or MacBook is also available in various choices of type on the market these days. When you want to buy laptop, you might need to consider the brand name and the specifications of laptop that you want to buy. Once you have your own laptop, you can use it to perform your tasks.
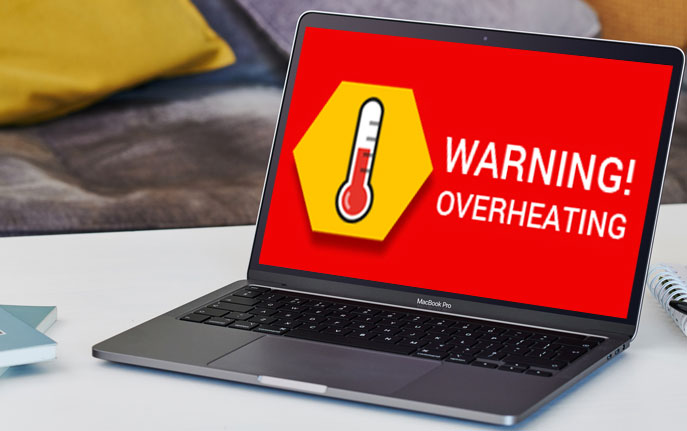
Why my Macbook Pro getting hot
When you use laptop, you might deal with several issues that might appear as well. One of the most common issues that might appear when you use laptop is overheating. One of the most common types of laptop that are available on the market these days is Macbook Pro. If you have Macbook Pro and your macbook pro getting hot, you might want to know the causes of this condition. Basically, your laptop can be overheating due to several causes. The most common cause of laptop overheating is because you use the laptop for long time. Laptop can be overheating because of software that makes your laptop works too hard as well.
Just like PC, laptop also has fan that is installed to cool down the processor and other peripherals inside the laptop. Sometimes this fan doesn’t work due to dust or other particles that clog the motor of the fan. If you find out that macbook pro getting hot because the fan doesn’t work, you might need to clean the fan and check the fan. If the fan in your laptop is still not working after you cleaned it, you might need to replace the fan with the new one.
When you have a new iPhone, it is important for you to know the tutorial for your new iPhone. It is of course that it will be very useful for you, especially for the beginners. The iPhone tutorial for beginners will help you to know everything about iPhone. In this case, you will find the iPhone tutorial in setting up your new iPhone. Besides, it also will be available for you the simple ways in order to navigate the interface. So, please give your good attention!
How to set up new iPhone in iPhone tutorial for beginners
In relation to the setting up your new iPhone, there are some simple ways that you can do. Are you curious about them? If it is so, let’s follow these ways below!
Click home button
Before clicking the home button on your new iPhone, you will find “Hello” on the screen. After that, you should click the home button in order to open your iPhone.
Choose the language OK
The second step is choosing the language that you want to use. Then, you should also choose your region or country where you live.
Activate the device
In this case, you are suggested to choose the Wi-Fi network that is available. On the other hand, you can also use your own data by tapping use cellular connection.
Asked about the location services
It means that you are allowed to enable or even disable the location services.
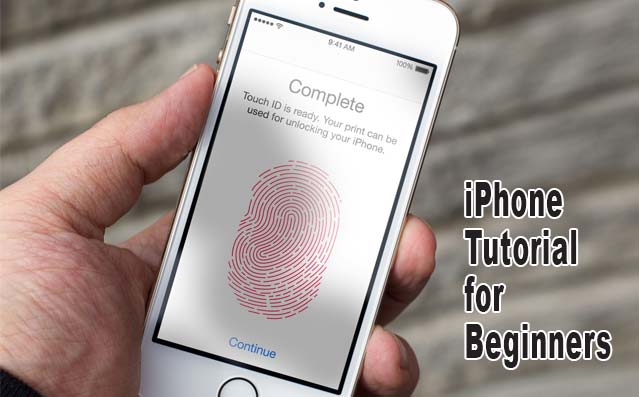
Set up Touch ID
The next step is setting up the Touch ID. You can do it by entering your own passcode.
The first way is called a single press. When you want to close some applications on your iPhone screen, you can do it by pressing simply the home button.
Double press
If you press the home button twice quickly, what does it mean? Yea, it means that it will bring up some applications that you have recently used.
Double tap
By tapping doubly, you are able to reach the screen top using your thumb.
Both matters above are very significant to know in the iPhone tutorial for beginners. So, for the iPhone beginners, you are very suggested to know everything about the iPhone. It is intended to be able to operate your new iPhone correctly.
By visiting our site, you agree to our privacy policy regarding cookies, tracking statistics, etc. Read more